Homeschool: Rain & Clouds (Week 13)
We just completed our twelfth week of homeschool. You can view our daily schedule (including which curriculum we use for math and reading) by clicking the link. Below you'll find the art and science activities we did this week - focusing on Rain & Clouds.

- Book: The Cloud Book by Tomie de Paola & Little Cloud by Eric Carle
- Activity: Cloud Art
- Supplies: Blue Card Stock, Cotton Balls, & Glue
We read about the different types of clouds (cumulus - puffy clouds; stratus - flat sheet clouds; and cirrus - feathery clouds) and how rain comes from the clouds. We also read about how clouds look like different images in the sky. We each made our own cloud image with cotton balls and glue.

 |
| My four's idea (top) made a scene from one of our books and my six made a crocodile) |
TUESDAY:
- Book: The Snowflake: A Water Cycle Story by Neil Waldman
- Activity: Water Cycle Experiment & Craft
- Supplies: Water Cycle Cards, Water Cycle Song, Pot, Salt, Small glass container, Lid, Plate, Ice
Today we learned about how clouds are formed and the water cycle. We talked about these Water Cycle Cards (Evaporation, Condensation, Precipitation and Collection - purchase the set we used this week HERE by Tina O'Block) and sang this Water Cycle Song that really helped us remember the the words and cycle.


Afterward we did an experiment to demonstrate the water cycle. Here's what to do:


1) Fill a pot with 2-3 inches of water and add a few teaspoons of salt - this represents salt water from the ocean. Have your children taste the salty "ocean water". Place a small glass container in the middle of the pot, so we can see how much water we collect from the evaporated water.


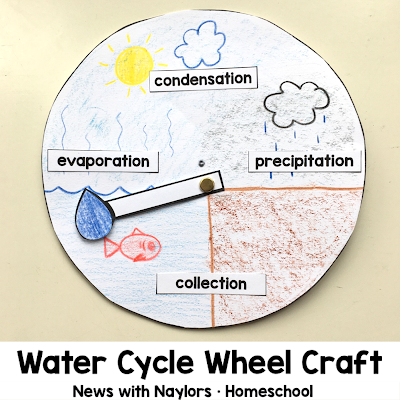
After reading our book and reviewing the water cycle song, we made this water cycle craft. We decided to draw our own cycle for an additional art practice this week, but you can print the cycle and color it from this Water Cycle Set HERE by Tina O'Block. After our craft was complete, we moved our water around the cycle while singing the song again. We also talked about the wonderful creation of the earth and how amazing it is that water is re-used over and over. We have the same amount of water on the earth today as when the dinosaurs roamed the earth!


2) Place the pot on a stove burner and turn the heat on - representing the sun. Place a lid on top of the pot. After a minute or two, you'll start to see the water evaporate and form into "clouds" on the top of the lid. If you barely lift the lid, you can see the steam come out, which looks a lot like clouds.


3) Take the pot off the burner. Remove the lid and put a glass plate (so it doesn't melt) on top. Place a few ice cubes on top of the plate. When the evaporated water reaches cold air (like the ice) it forms clouds. Once there's enough water in the cloud, it rains. Wait five minutes. Remove the plate and check the amount of water collected.


4) Taste the collected water - and point out how it's not salty! Ask your children why they think that is? Water is light enough to evaporate, but the salt particles are heavy enough they stay behind in the pot. That's why the collected water tastes clear and clean.
WEDNESDAY:
- Book: Water is Water by Miranda Paul
- Activity: Water Cycle Wheel Craft
- Supplies: White Card Stock, Colored Pencils, Rain Drop, Brass Fastener


THURSDAY:
- Book: Down Comes the Rain by Franklyn M. Branley
- Activity: Make it Rain Science & Fun in the Rain Jar
- Supplies: Jar, Shaving Cream, Blue Food Coloring, Squeezer, Let It Rain Printable
We've done this before, but it had a new meaning after learning about the water cycle this week. Set up the experiment by filling a glass jar with water and shaving cream on top. We guessed how many drops of water our "cloud" would hold before raining (wrote it down on our paper - see below), dripped water into the cloud and counted the number of drops before we could see it "rain".


One of my goals this year is to enjoy being outside in the rain! We have one-piece rain suits, rain boots and the gear we need to be outside! The boys and I made this simple "Fun in the Rain Jar" and put ideas inside of things we could do in the rain. I will post our ideas later.

FRIDAY:
- Book: Hurricanes by Gail Gibbons & Tornadoes by Gail Gibbons
- Activity: Magic Paint Storm Clouds
- Supplies: Flour, water, baking soda, salt, food coloring, card stock, squeeze bottles
My boys LOVE Magic Paint. We make it every few months, depending on our theme, and look forward to it every time. I love that you can make the paint in a blender, it's easy to use and it dries in the microwave (that's why it'd called magic!) The paint looks so cool when it dries. It puffs up and my boys love poking and squishing it.

A few pictures:
 |
| I made one batch yellow, one batch blue and one batch gray (I actually added black paint, instead of food coloring, and it turned out great.) Pour colors into squeeze bottles. |
 |
| Create any kind of design. |
 |
| Wet Paint - Ready for the Microwave. |
 |
| Dry Paint - Microwave in 30 second increments until dry. Ours took 1:30. |
 |
| Look how puffy this is! |

 |
| A fun, creative afternoon! |
Other Books we enjoyed this week: This and the Tornado by Loren Long, Weather Words by Gail Gibbons


