Homeschool: Pilgrims (Week 14)
We just completed our thirteenth week of homeschool. You can view our daily schedule (including which curriculum we use for math and reading) by clicking the link. Below you'll find the art and science activities we did this week - focusing on Pilgrims.

- Book: Pilgrim Cat by Carol Antoinette Peacock
- Activity: Then & Now Sorting
- Supplies: Then & Now Sorting Cards
I printed these cards from A Dab of Glue Will Do. We only used the ones that pertained specifically to the pilgrims and the activities we'll be doing this week. It was fun for the kids to see what people did back then. We also read "The Pilgrim Cat" and talked about why the Pilgrims left England and how they had to have a lot of faith to leave. It wasn't an easy trip and things took a lot longer back then. It's not like they could just turn on a light switch or go to the grocery store for food. They had to make their own candles, homes, quills and ink, grow/hunt their own food, etc. We also started bread today, to use for tomorrow...

TUESDAY:
- Book: Samuel Eaton's Day by Kate Waters
- Activity: Homemade Bread, Butter & Jam
It was so much fun reading about what a pilgrim boy's day was like. I wish I would have checked out "Sarah Morton's Day" from the library as well. We learned what they wore, how they found food, how the kids served their parents meals, and how they harvested wheat. It's so interesting learning about how different their days were from ours now.
Homemade Dutch Oven Bread (no knead!): You need start this 12-24 hours in advance.
Homemade Freezer Jam: We made this in the summer and brought it out today. You could also "hunt" for berries and squish them with a fork to make a jam paste.
Homemade Butter: This was so cool. We made homemade butter in an empty baby food jar. We talked about how the Pilgrim's would have found whipping cream (milk a cow and use the top layer of milk).
- Pour heavy whipping cream into an empty baby food jar until it's 2/3 of the way full (save the whipping cream container for Log Cabins tomorrow!) Screw the lid on.
- Shake for 3-5 minutes and you'll notice the whipping cream has started to harden - you won't be able to feel or it it sloshing around inside anymore. This means you're close.
- Shake for another 30 seconds and you'll notice a butter ball pulling away from a liquid - the liquid is buttermilk!
- Remove the butter and save the buttermilk to make pancakes!
You can watch a video tutorial on The Stay at Home Chef. I had to help with the shaking. It was a good reminder how much work it would have been to be a Pilgrim.


WEDNESDAY:
- Book: The Story of the Pilgrims by Katharine Ross
- Activity: Log Cabin Houses


THURSDAY:
- Book: Tattered Sails by Verla Kay
- Activity: Quill Writing
This was also very interesting and so different from just grabbing a pen, like we do today. We made our own ink with strawberries! You mash the berries, strain the juice, and use it to write. We learned it's a lot harder to write with a feather than a pencil! We also talked about how there was no mailman. To send a letter, someone would have to either walk or use a horse to send a letter.


 |
| Mash Berries |
 |
| Strain the Juice. |
 |
| Find a feather "outside" |


FRIDAY:
- Book: Ox-Cart Man by Donald Hall
- Activity: Homemade Candles
This activity was a highlight of the week. Back then, the pilgrims would gather bees wax, melt it in a pot and dip strings in the hot wax, cool it and dip again to make candles. Talk about a lot of work. How often do we take turning a light switch on for granted?
We made wax by melting crayons (our version of bees wax) in a tin can.


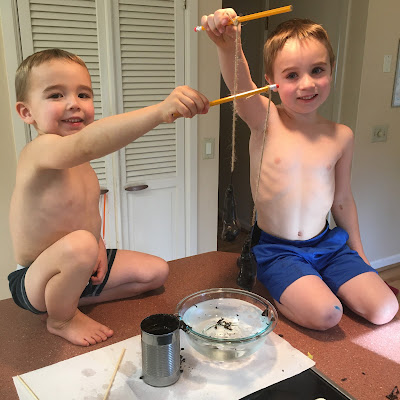

We made wax by melting crayons (our version of bees wax) in a tin can.

 |
| Place unwrapped crayons in an empty can. Place in a pot with water. Turn on the heat. |
 |
| The water will boil and make the crayons melt. My kids loved this part. |
 |
| Place the HOT can on a paper towel and get a bowl of ice water ready, to help cool the wax. Go one child at a time. Dip a string in the hot wax, then put it in the ice to cool, dip the string in hot wax again, put in the ice to cool. Do this over and over until your candle is the size you want. |


 |
| Our final candle. Cut the string to make a smaller wick. |

We actually lit ours that evening. We place the candle in a bowl, so it was steady and lit the wick. We talked about how you could re-use the wax that was melting off to make another candle.


