Homeschool: Fungi (Week 12)
We just completed our eleventh week of homeschool. You can view our daily schedule (including which curriculum we use for math and reading) by clicking the link. Below you'll find the art and science activities we did this week - focusing on Fungi (Mushrooms, Yeast & Mold).
- Book: The Mushroom Hunt by Simon Frazer
- Activity: Hunt for Mushrooms & Grow Mushrooms
- Supplies: Magnifying Glass & Mushroom Growing Kit
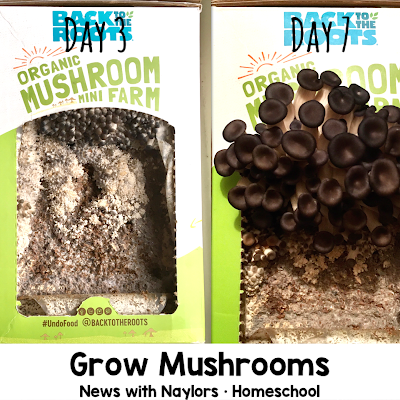
We're lucky we live in Oregon and have mushrooms all around us. This week, we met together with friends to look for mushrooms. We had so much fun, but didn't find many mushrooms. When we came home, we looked in our yard and found so many (including this huge one pictured below)! We didn't dare touch them, but we got a good look and used sticks to examine them. When we came inside, we started this Mushroom Growing Kit. We followed the directions on the box and have mushrooms growing now!
 |
| Mushroom Hunt with friends. |
 |
| Mushrooms in our yard! |
 |
| This one was the size of my kid's hand! It was like a treasure hunt finding mushrooms in our yard. |
 |
| Getting our mushroom kit ready to grow mushrooms. Easy instructions are on the box. |
 |
| Baby mushrooms starting to grow! |
 |
| Day 10 - Full grown mushrooms! We harvested them and are going to eat them this week! |
TUESDAY:
- Book: Life Cycle of a Mushroom by Angela Royston
- Activity: Mushroom Crayon Resist Craft
- Supplies: White card stock, black crayon, white crayon, liquid watercolors
We talked about the parts of a mushroom and how they grow. The parent mushroom has tons of spores found in its gills. The spores are released, grow threads and then a new mushroom grows. Mushrooms play an important part of the earth - they help feed animals and humans as well as help leaves/rotten wood decay. For our art project, I gave my kids paper and they drew a mushroom with a black crayon. They drew spots and different designs with a white crayon and then painted their mushrooms with watered down liquid watercolors. I love how these all turned out!
WEDNESDAY:
- Book: Mushroom Fan Club by Elise Gravel
- Activity: Spore Prints
- Supplies: White Card Stock, Mushroom, glass bowl
At the end of this book, it gives directions on how to make Spore Prints. I bought these huge mushrooms from the grocery store and we used them for our activity. Here's what to do:
1) Examine the mushroom. Feel the gills and point out the different parts.
2) Remove the stem.
3) Place the cap face down on a piece of card stock and cover it with a glass bowl.
4) Wait 24 hours and then remove the bowl and mushroom to see your spore print.
1) Examine the mushroom. Feel the gills and point out the different parts.
2) Remove the stem.
3) Place the cap face down on a piece of card stock and cover it with a glass bowl.
4) Wait 24 hours and then remove the bowl and mushroom to see your spore print.
Other Mushroom Books: Plants that Never Bloom by Ruth Heller, Mushrooms in the Rain by Mirra Ginsburg, and From Seed to Spore by Lisa Owings
THURSDAY:
- Book: None.
- Activity: Balloon Yeast Experiment
- Supplies: Packet of dry active yeast, sugar, water bottle, balloon
Another type of fungi is YEAST. Some yeast is harmful, but some are very helpful especially when making bread and other foods and drink. Something really neat about yeast is that it loves to eat sugar (just like kids!). But, when the yeast eats sugar, it's almost like it "burps" and releases air (carbon dioxide). The air forms in bubbles and the yeast even creates enough air to blow up a balloon! This experiment shows us that yeast is a living organism. Here's what to do:
1) Fill up a plastic water bottle with one inch of warm water.
2) Dump in one packet of dry active yeast and 1 tablespoon of sugar.
3) Immediately place a balloon over the neck of the water bottle.
4) Wait a couple minutes and watch bubbles appear and the balloon blow up!
Note: You could also make bread to demonstrate how yeast works. Make one loaf with yeast and one without. When you make bread, the yeast eats the sugar and releases carbon dioxide. That's what makes the bread rise and the air pockets create soft, fluffy bread. When the bread bakes, the yeast dies and it's safe to eat. We demonstrated this concept in a recent family home evening lesson on Spiritual Growth.

FRIDAY:
- Book: Mold Video on Youtube
- Activity: Mold Experiment
- Supplies: Paper plate, food options
Mold is also a kind of fungus. In order for mold to grow it needs moisture and nutrients. There are tiny spores in the air and they start to grow when they land on moist surfaces. They feed off of the proteins and nutrients found on food and start to grow. Mold likes to grow in warm places, and that explains why we keep a lot of food in the refrigerator. Here's what to do:
1) Place 5-6 items on a paper plate (we used a kiwi, pear, refried beans, sour cream, Swiss cheese and bread).
2) Talk about which ones your children think will grow mold first.
3) Examine the mold each day and watch for mold!
1) Place 5-6 items on a paper plate (we used a kiwi, pear, refried beans, sour cream, Swiss cheese and bread).
2) Talk about which ones your children think will grow mold first.
3) Examine the mold each day and watch for mold!
(post picture and results to come..)


